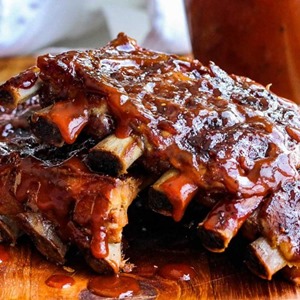
Everyone likes to nib on a tasty rib! There are many recipes, from slow cooking and smoking to straight on grilling ribs, and the latter turned out to be the favorite of many. The main reason is, of course, the chance to get into it without having to worry about grease and rules in general. There is no “special fork for ribs”, and the whole grill cookout is interactive and fun for everyone, not just the cook.
In this guide, we will go through the most important info you need to get to that delicious and fun experience of eating nicely cooked ribs. People often think that grilling is easy, especially when it comes to larger pieces of meat, but that kind of attitude will only leave you with a chewy or charcoal-like meal, which no one likes. Not to mention the time invested, let alone the money for the meat and everything in between.
What Kind of Ribs Should You Get?
A vast majority of people, when they talk about ribs, mean to say pork ribs, and that is what we are going to talk about today. However, if you go to your local butcher shop and ask for pork ribs, they will ask you: “baby rack or spareribs?”, and we will prepare you for that question right away. The types of ribs that you can get are divided into two major groups:
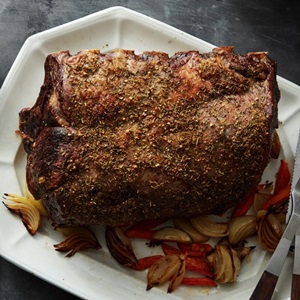
Baby back ribs
 These are the most popular ribs out there, due to their compact size, and the simplicity of preparing them. Let’s get this right out of the way: baby back ribs are not made of baby pigs or extremely young pork whatsoever. They are called baby ribs because of the way they are cut into a small, short slab. These ribs are cut from the spinal part of the animal, where the meat is leaner and less fat in general. A slab of baby back ribs comes with 9 to 13 ribs on them, and they are 2.5 to 7 inches long on average.
The simplicity of preparation is there due to their size, because contrary to popular belief, the smaller the piece, the shorter the cooking time.
Spare ribs
No, these are not pork leftovers as the name might suggest. Spare ribs come from the chest part of the pig, where the sternum connects them into a single piece. This middle bone is removed and the ribs are separated into slabs, which are larger than baby back ribs, sometimes even double in size.
The special thing about spare ribs is that they are full of tasty meat, yes, but they are also much, much fattier than the baby back. So, if you are a fan of slightly fatter and juicier meat, spare rib slabs are the way to go. The sole size of spare ribs requires of it to be cooked for a longer period of time compared to the baby back rib slabs.
What Comes Before the Grilling?
 As opposed to sausages, steaks, and burgers, ribs require special attention before you actually put them inside an offset smoker or for example, a small bbq grill. When you buy a fresh rack of ribs, you can’t just go on and put them on a hot grill grate expecting to be flavorful and juicy. Rib preparation includes:
- Membrane removing – Pork ribcage comes enveloped in a thin, but quite sturdy, a membrane which is not removed for protection reasons. If the membrane stays on, you will find it extremely hard to smoke, season or cook the ribs.
- Trimming – This is the process of removing the extra bone, or resizing the ribs to fit your grill or smoker. If you are not sure how to do it, talk with your local butcher and ask for a rack that will fit the setup you have at home. A rib trimming set is not a standard part of kitchen tools, so check the size of the ribs twice.
- Drying – The last part of the prep process before the cooking itself. Ribs are dried for several reasons, but the main ones are: protection from germs and bacteria, and homogenizing each rib, making it equally moist/dry in every way you can.
- Seasoning – It can be done before cooking as an optional flavor-enhancing technique, but the seasoning is always done before the ribs are done the cooking. The most common way to do it is by buying a bottle of good old BBQ sauce. However, more experienced cooks prepare their own mix. It’s is best to familiarize yourself with other stages of rib cooking, and leave the customization of seasoning part for last.
Preparing a nice slab of ribs is not hard and there are no special requirements in terms of equipment, besides a solid grill. But, like everything in life, it requires the best ingredient of them all: patience. If you plan to do it fast, the best thing would be to reschedule the rib cookout, because there is simply no way to just storm through it.
If the ribs are overcooked, you will end up with meat on one, and bones on the other side of the plate. People adore eating rib meat for the taste AND the fun of it. Overcooked ribs are not fun at all. Also, no one like the taste of burnt soggy meat in their mouth, no matter how nutritious.
If the ribs are undercooked, the meat will be chewy and hard to swallow. Eating meat directly off of a bone is entertaining, yes, but not if you have to twist and turn every few seconds. Not to mention the gelatinous fat which has not reached the point of melting. The taste of it is simply awful.
This is where patience comes into play. You need to find the balance between the two, and we will tell you how to achieve it with ease.
How Long to Cook Ribs on a Grill?
So, finally, the matter at hand! After we covered everything you needed in case of meat choice, preparation, and seasoning, let’s get into it and find out how much time do you need to prepare juicy ribs for yourself, and guests of course.
If you intend to cook on a charcoal grill, which we strongly recommend due to the special flavor charcoal gives to the meat, the temperature your grill needs to achieve should go around 225 degrees Fahrenheit. Now, this might seem as low heat, but there’s more to it. The rule is, the slower the tastier! If you do it on 225 degrees, it will take a total of 5 hours, on average to slow cook them, with another half hour for seasoning, and another half hour of direct heat.
Firstly, you need to cook them naked. This means to expose the ribs directly to the heat source, with no foils or wrapping on or around the meat. Proceed with this for about 3 hours. After this, wrap the ribs in foil or butcher paper, and proceed cooking them for about 2 hours. With 5 hours total behind you, take the ribs off of the heat source, unwrap them and apply the seasoning and sauces. Try to shorten the time this takes for the sake of not lowering the temperature. When the seasoning is applied, return the rib racks and cook them over a direct heat source, naked, for about 30 – 60 minutes. The last thing to do is let the cooked ribs rest for 15 minutes! This will let the juices get absorbed back into the meat, making it tastier and juicier.
The whole process of cooking ribs depends on the thickness of bone, and the amount of grease the meat contains. The more fat and bone it has, the longer you will have to cook them, with the average total cooking time of 6 hours.
Cooking ribs on a tabletop propane grill is somewhat similar. All you have to do it make a 2-heat zone by turning off half the burners. Use this method to maintain the low heat inside the grill. The rest of the cooking process remains the same.
Can you do this faster? Yes, you can, but we do advise against it. Preparing ribs should be a steady and stable process, with no rush whatsoever. There is a way to prepare them faster, but it puts your meat in so much risk, that the reward simply isn’t worth it. Shortening the cooking time by an hour will get you nowhere if the meat is burnt to a crisp.
How To Check the Readiness of the Ribs?
Here are three quick methods you can use to check if the ribs are ready for munching!
- The Twist – Grab a rib in the middle of the rack, and pinch its tip. Use a small amount of force to twist the rib. If the meat starts to fall off, the ribs are done.
- The Bend – Take cooking tongs and grab the rack at the middle. Carefully lift it and watch the meat. If small rifts appear, and the meat breaks apart, the ribs are ready.
- The good old Toothpick test – This test is used in the kitchen a lot, and it applies here as well. Take a toothpick and poke the meat between the ribs. If the meat shows no resistance, the ribs are ready. Just make sure to poke around, and not in a single spot only.
One Last Thought
Cooking ribs is a lasting process. It begins in the butcher shop, from choosing the right type, and the adequate piece of this gorgeous meat. Rib preparation is no burger flipping, and it should be treated with a bit more caution. But, with more work around the grill come greater rewards.
Up your grilling game, and take on the challenge of rib cooking, you will thank yourself after!
Tried your method for cooking ribs. Used spare ribs. Cooked them on 260 which was as low as I could get the grill. Took 8 hrs to get them tender. When got finished with the ribs, they tasted very weird. Used a store bought sauce, Dave’s, and they looked good. The ribs were not spoiled when we started cooking them. We cooked another slab from the same pack in the oven and they were fine. Any idea what went wrong?
Thx
Dennis Reagan