If you ever had unexpected guests, or your meat delivery guy failed to fulfill the order for the grill cookout, you have certainly felt the inconvenience of having to thaw chicken meat just before you start cooking. As it turns out, fast defrosting and thawing is not a rare thing, and we are going to talk about all the ups and downs, as well as the “hows”, of chicken defrosting. There are many important rules regarding poultry that every chef out there should follow because we are all aware of the dangerous bacteria that dwell around chicken meat.
But, worry not, we got your back! Let us heat up this topic and dive into defrosting techniques!
Before We Begin
 As in any other job around the house, a good tool can make all the difference in the kitchen too. This is why we would like to go through some of the equipment that you should get in order to execute the whole thawing process as fast and as safe as possible. Of course, variations are welcome too, and for experienced cooks, some of these are not necessary at all, but it is always better to be safe than sorry, especially with chicken meat. So, what kind of equipment do you need?
- A good digital thermometer – By far one of the most useful tools you can get, not only for the job of defrosting. A high-quality thermometer will help you thaw, defrost and cook the chicken up to the health standards, and more (depending on your skill and experience). The minimal temperature a chicken should be cooked at is 165 degrees Fahrenheit, but that’s not the only situation you’ll use it in. The bacteria that live on the chicken skin, and slightly below, thrives on a temperature interval of 40 to 140 degrees. Keeping the meat inside this heating zone is dangerous, and a thermometer will help you avoid it.
- A solid pot or a bowl – This is where the defrosting will take place. If you do not plan to use the microwave to thaw and defrost the chicken (more about that later), you should probably use a steel bowl or pot to do it. This material is ideal because it is not that suitable for bacteria to multiply on, ad if you do not have any steel around, any metal will do. Plastic is only welcome in the case that you decide to use the microwave, for obvious reasons.
- A microwave oven – Some defrosting techniques will require you to use a microwave in order to achieve maximum efficiency in the least time possible. The defrosting process depends on the strength and the size of the oven; however, you will be glad to know that you do not need a heavy-duty appliance. Defrosting happened on non-cooking temperatures, so an average oven will do just fine.
- Smaller accessories – In this group of the things you need are the somewhat non-essential things, which should be considered a welcome bonus:
- A timer. Any type of timer will do. With some types of defrosting expect that you will have to measure time intervals for changing the water, or lowering the power setting on your microwave (given that the oven you have doesn’t have one).
- Paper towels, a bunch of them. This counts toward microwave defrosting specifically. The more water and ice you manage to wipe off, the better and quicker the thawing will be.
- Sharp kitchen knives. Yes, there will be some cutting and meat separation involved, so its best to make sure that your knives are sharp and ready for action.
Chicken Defrosting and Thawing Techniques
So, its time to get to the core of the matter, and see what can we do to get our frozen chicken meat ready for cooking as fast and effective as possible. The techniques are going from shortest to longest regarding the time needed. Every way of defrosting has its ups and downs, which we are going to touch upon.
1. No thawing! Direct cooking
Yes, this exists! Unfortunately, the number of recipes you can make with no defrosting is not that impressive. Still frozen chicken can go into long-cooking recipes only. Stews, soups and any type of longer-lasting cooking is fair game, but it comes with a price. You must double the time specified in the original recipe.
The thermodynamics of liquids do not allow for a quick cook when you introduce all the ice to the pot. That’s why a frozen chicken can only go into slow cookers or similar ways of preparing. One thing you should be extra careful about is cutting frozen meat. Do it only if you absolutely must, because cutting frozen meat can bring you to some serious injuries. High caution is advised!
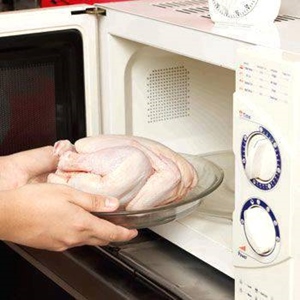
2. Quick Defrosting – Microwave to the rescue! 10 min or less.
We mentioned that a good microwave oven can prove as a great ally in the task of thawing and defrosting. There are several things you should do before the sole act of putting the meat inside the oven, no matter the quality or quantity of chicken you have.
- Use paper towels and try to soak up as much water and ice particles as you can. Do not rub the chicken skin because you can get a lot of paper on it, and that is a drag to clean up.
- DO NOT use metal cookware or metal tools around or inside the microwave. This cannot be stressed enough, and you would be surprised how many microwaves are destroyed this way. Some chicken comes premade in pieces, on metal skewers. Make sure you remove them.
- Even though you can be a bit more relaxed with timing through other defrosting techniques, if you use a microwave, be exact with the time intervals. There is a thin line between thawing and half-cooking chicken meat in an oven.
- Get to know your microwave oven. It’s simple: just make sure you know what kind of setting you are using, regarding output power and timing.
2.1 Defrosting boneless chicken in a microwave oven
For boneless chicken, especially chicken breast, you won’t have to spend much time standing around the microwave, but your timing must be impeccable! Start on medium to the low setting on the oven, and keep the meat in for 2 minutes. What you need to do next is get the meat out, and separate any meat parts that stuck together. This will speed up the process and make cooking easier later.
After you’ve separated the meat, put it back in on low power setting and set the timer. The amount of time boneless chicken has to spend depends on the total weight. Factor in 1 minute for every 8 ounces of meat. Check on the meat regularly, and do not let it cook inside the microwave.
2.2 Defrosting bone-in chicken in a microwave oven
The things with chicken bones, as with any other bone-in meat, is that it takes longer to cook. This rule applies for thawing and defrosting too. Bones add to mass, and because of their hollow nature, they tend to retain current temperature for a longer period of time.
After you have soaked up all the excess water and ice with a paper towel, put the bone-in chicken in the microwave and let it heat up for about 2 minutes on medium power. When the time passes, get it out and separate any pieces that stuck together, and flip them over. Put the separated meat back in the oven and turn it on low to medium power. Set the timer like this: 1 minute for every 24 ounces of meat. Watch the timer carefully and take out the chicken when done.
3. Hot Water Defrosting – Up to 15 minutes
 This is the least favorite thawing technique out there, and it needs to be executed with precision. Submerging the chicken in hot water is dangerous due to all the bacteria that will try to get in. This must only be practiced if you intend to cook the chicken meat immediately after it defrosts. So, how should you do it?
You can either use the sink (sanitized and squeaky clean) or a larger steel pot. Either way, you start with letting the hot tap water flow and reach about 130 degrees Fahrenheit. If you are not sure about the temperature, use the thermometer. Just remember to not fill it entirely, and account for the volume of the meat you are defrosting. After you fill the pot/sink, submerge the chicken meat into the hot water. Small pieces will thaw more quickly than the larger ones, and if you are defrosting a whole bird, you need to make sure that the water reached the inside.
To speed up the process, leave the water tap on to pour fresh hot water over the meat, as long as you open the drain to match the flow. Keep the meat inside for up to 15 minutes. When you pull it out, use some paper towels to dry it as much as you can before cooking. Remember, this way of defrosting chicken is risky because of the bacteria that will be attacking it, so make sure to start cooking as soon as the defrosting process is done!
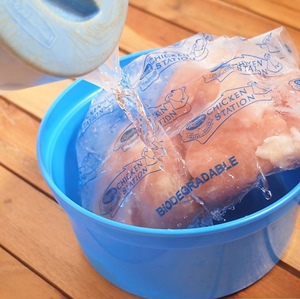
4. Cold Water Submersion – 25 to 30 minutes
This would be the safest bet when it comes to thawing chicken, whole bird or just pieces. It is bacteria-proof as long as you change the water, and keep it cold. Most professional restaurants use this technique and even have cold chicken baths as a part of the kitchen.
Firstly, get a large pot or bowl, and fill it with cold water. Make sure to put the chicken and submerge it in the water, not the other way around. After the chicken is fully submerged, start the timer for 10 minutes. Even though cod-water submerging lasts for half an hour, you will have to change the water every ten minutes, for temperature and safety reasons. Clean water is needed to wash out any bacteria that tried to attack your meat.
After the first ten minutes, the meat will start to loosen up. This is the perfect timing to split any stuck-together pieces and bring them apart. Change the water, and star the timer for another 10 minutes. After the second timer expires, check if any parts remained stuck, and separate them accordingly. Change the water and wait for the final 10 minutes before taking the chicken out of the cold water. Clean excess water with paper towels before you move on to prep/cooking.
Some Practical Tips to Remember!
- The faster the defrosting, the more accuracy you will need. A good thermometer and a timer are your best friends in this case.
- Avoid hot water defrosting if you can. This has potential health hazards written all over it, due to the fact that bacteria thrive on the temperatures between 40 and 140 degrees Fahrenheit. If you must use this way of defrosting, use it only if you intend to cook right after it.
- Use paper towels to dry the meat, but do not overdo it. No one likes having mashed paper as a side dish with their chicken. Do it gently and moderately.
- You will be tempted to use hot water when using the submerging technique. Resist that temptation at all costs!
- Clean your thermometer during the process. Do not probe the meat before, during and after defrosting without cleaning or changing the probe. This way you will avoid bacteria transfer.
On a Final Note
Practical knowledge takes some trial and error to become a part of your cooking skillset. Big chefs and world-renown cook rarely talk about this stuff, but we think that this kind of kitchen wisdom is the core of every recipe, no matter how big or small it is.
If you already found yourself in the situation of needing extra meat, and all of your chicken is frozen, why not arm yourself with knowledge, and jump over that obstacle with no sweat. After all, a good cook needs to know how to work with both ice and fire!